
How to Crochet a Pumpkin gift bag
Wednesday, October 01, 2014
Hi everyone! =)
How are you? I hope great! ^_^
Today i'm super excited because finally i finished the PUMPKIN GIFT BAG tutorial!
This cute crochet bag is perfect as a Halloween gift, because you can put a lot of small candies in the inside and i'm sure that the kids would love it! Specially because when the candies are gone, they can use it to carry a lot of things, like pencils, keys and of course more candies =D
I can't believe we are in October and it's almost Halloween time! ^_^, I love this month because i can see horror movies in TV all day, but don't think that i'm a brave person, actually, i get scared really easy LOL! But i do love those type of movies... and you?
Anyway, I hope this tutorial can be very helpful to you, and if you have any doubt please do not hesitate in contact me! =)
Thank you so much for everything, have a great day! =)
| » MATERIAL |
 | Orange Yarn or Thread for a 3mm Aluminum Crochet Hook | |
 | Dark Green Yarn or Thread for a 3mm Aluminum Crochet Hook | |
 | Green Yarn or Thread for a 3mm Aluminum Crochet Hook | |
 |
2.5mm Aluminum Crochet Hook | |
 |
Scissors | |
 |
Tapestry needle (pointless) |
 |
| TIP REMEMBER THAT YOU CAN CHANGE THE SIZE OF THE CROCHET HOOK AND YARN ACCORDING TO YOUR PROJECT. |
| » HOW TO DO IT? |
 |
| STEP 01 / ROW 01 |
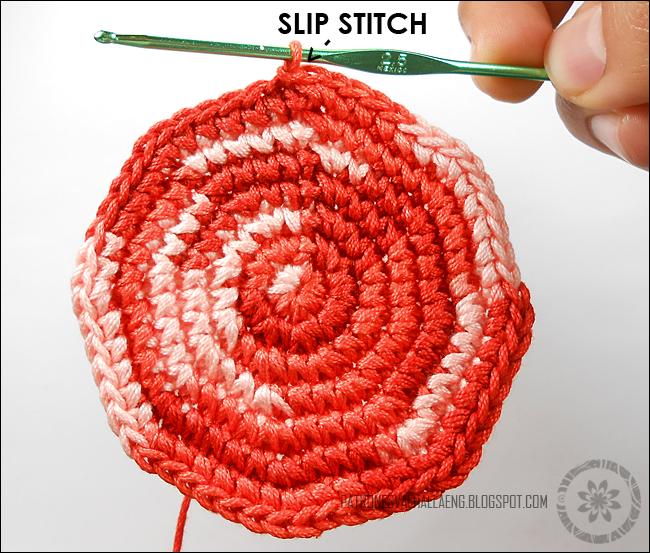
Magic Ring, 8 single crochet and finish with a slip stitch (do not close the magic ring yet). (8 stitches)
|


|
| TIP TRY TO LEAVE AT LEAST 15CM (ALMOST 6 INCHES) OF YARN WHEN YOU BEGIN THE MAGIC RING, THIS WILL HELP YOU TO FINISH OFF YOUR PROJECT PROPERLY. |
|
| TIP TO SEE THE FULL-SIZE IMAGE YOU HAVE TO CLICK ON THE SMALL PREVIEW. |
 |
| DID YOU KNOW... THAT THE MAGIC RING IS ALSO KNOWN AS "MAGIC CIRCLE" AND "ADJUSTABLE RING"? |
- - - - - - - - - - - - - - - - - - - - - - - - - - - - - - - - - - - - - - - - - - - - - - - - - - - - - - - - - - - - - - - -
 |
| STEP 02 / ROW 02 |
Make an increase in every stitch of the last row. Close the magic ring. (16 stitches)
|


|
| TIP WE ARE GOING TO FINISH EACH ROW WITH A SLIP STITCH. |
- - - - - - - - - - - - - - - - - - - - - - - - - - - - - - - - - - - - - - - - - - - - - - - - - - - - - - - - - - - - - - - -
 |
| STEP 03 / ROW 3 |
*Single crochet, increase (two single crochet in the same stitch)*. Repeat from * to * until you finish the row. (24 stitches)
|


- - - - - - - - - - - - - - - - - - - - - - - - - - - - - - - - - - - - - - - - - - - - - - - - - - - - - - - - - - - - - - - -
 |
| STEP 04 / ROW 4 |
*2 single crochet, increase (two single crochet in the same stitch)*. Repeat from * to * until you finish the row. (32 stitches)
|


- - - - - - - - - - - - - - - - - - - - - - - - - - - - - - - - - - - - - - - - - - - - - - - - - - - - - - - - - - - - - - - -
 |
| STEP 05 / ROW 5 |
*3 single crochet, increase (two single crochet in the same stitch)*. Repeat from * to * until you finish the row. (40 stitches)
|


- - - - - - - - - - - - - - - - - - - - - - - - - - - - - - - - - - - - - - - - - - - - - - - - - - - - - - - - - - - - - - - -
 |
| STEP 06 / ROW 6 |
*4 single crochet, increase (two single crochet in the same stitch)*. Repeat from * to * until you finish the row. (48 puntos)
|


- - - - - - - - - - - - - - - - - - - - - - - - - - - - - - - - - - - - - - - - - - - - - - - - - - - - - - - - - - - - - - - -
 |
| STEP 07 / ROW 7 |
*5 single crochet, increase (two single crochet in the same stitch)*. Repeat from * to * until you finish the row. (56 puntos)
|

- - - - - - - - - - - - - - - - - - - - - - - - - - - - - - - - - - - - - - - - - - - - - - - - - - - - - - - - - - - - - - - -
 |
| STEP 08 / ROW 8 |
Double crochet in each stitch of the last row. (56 stitches)
. |


- - - - - - - - - - - - - - - - - - - - - - - - - - - - - - - - - - - - - - - - - - - - - - - - - - - - - - - - - - - - - - - -
 |
| STEP 09 / ROW 9 |
*2 front post double crochet, 5 back post double crochet*. Repeat from * to * until you finish the row. (56 stitches)
|

- - - - - - - - - - - - - - - - - - - - - - - - - - - - - - - - - - - - - - - - - - - - - - - - - - - - - - - - - - - - - - - -
 |
| STEP 10 / ROWS 10-15 |
Repeat the STEP 09 six more times. (56 stitches)
. |


- - - - - - - - - - - - - - - - - - - - - - - - - - - - - - - - - - - - - - - - - - - - - - - - - - - - - - - - - - - - - - - -
 |
| STEP 11 / ROW 16 |
CHANGE COLOR . Single crochet in each stitch of the last row. (56 stitches)
|


- - - - - - - - - - - - - - - - - - - - - - - - - - - - - - - - - - - - - - - - - - - - - - - - - - - - - - - - - - - - - - - -
 |
| STEP 12 / ROW 17 |
Half double crochet in each stitch of the last row. (56 stitches)
. |


- - - - - - - - - - - - - - - - - - - - - - - - - - - - - - - - - - - - - - - - - - - - - - - - - - - - - - - - - - - - - - - -
 |
| STEP 13 / ROW 18 |
Single crochet in each stitch of the last row. (56 stitches)
.
|

 |
| STEP 14 / ROWS 19-22: |
Repeat the STEP 13 four more times. (56 stitches)
.
|

- - - - - - - - - - - - - - - - - - - - - - - - - - - - - - - - - - - - - - - - - - - - - - - - - - - - - - - - - - - - - - - -
 |
| STEP 15 / PLUS: HOW TO PUT THE THREAD OR YARN TO CLOSE THE BAG |
Cut three pieces of 20 inches of green thread or yarn, and with the help of a 3.5mm Aluminum Crochet Hook enter them in the row of Half Double Crochet (step 12 / row 17) in "zig-zag".
Try to avoid the stitches that are over the front post double crochet to have a better "pumpkin" look ^_^. |

|
| TIP
IF YOU WANNA MAKE AND SAVE A LOT OF THIS BEAUTIFUL GIFT BAGS, YOU CAN FILL THEM WITH NEWSPAPER SO THEY DON'T LOSE THEIR "PUMPKIN" LOOK.
|
- - - - - - - - - - - - - - - - - - - - - - - - - - - - - - - - - - - - - - - - - - - - - - - - - - - - - - - - - - - - - - -
If you liked the pattern and you know about someone who would love to make it, please don't forget to share the link of this entry, also remember that you can add this project to your PINTEREST board, follow this blog with your Gmail account and leave a message in the comments box below! =D


0 comentarios
Thank you very much for your comment!